Implementation
Usage
Battleaid offers LoadableConfig to make defining and loading configuration files simple. LoadableConfig will automatically initialize class fields when an instance of the configuration is created. This encourages reuse and supports scalability.
I. Defining Configurations
To define a configuration, you must create a class that meets these requirements:
The class shall extend
LoadableConfig.All fields in the class shall be declared
publicand uninitialized.Fields shall be typed as one of the following:
int |
long |
short |
byte |
char |
float |
double |
boolean |
String |
LoadableConfig |
int[] |
long[] |
short[] |
byte[] |
char[] |
float[] |
double[] |
boolean[] |
String[] |
LoadableConfig[] |
The class shall contain a
publicconstructor with a single parameterString filenamethat callssuper.load(this, filename).Nested config definitions shall have an empty,
publicconstructor and no other constructors.Nested config definitions shall be outside the scope of the encompassing config definition.
Non-optional fields shall be annotated
@Required.
For example:
 1// CarConfig.java
 2public class CarConfig extends LoadableConfig {
 3    public int mpg;
 4    public long odometer_measurement;
 5    @Required public Engine some_engine;
 6    @Required public boolean is_manual_transmission;
 7    @Required public Wheel the_wheels[];
 8
 9    public CarConfig(String filename) {
10        super.load(this, filename);
11    }
12}
In this case, the Engine and Wheel are nested LoadableConfigs:
1// Engine.java
2public class Engine extends LoadableConfig {
3    @Required public int number_of_cylinders;
4    public float liters;
5    public String style;
6    public short horsepower;
7
8    public Engine(){};
9}
1// Wheel.java
2public class Wheel extends LoadableConfig {
3    @Required public float radius;
4    @Required public String position;
5    public int number_of_lugs;
6
7    public Wheel(){};
8}
Note
Optionally, one can call LoadableConfig.print(this) to view the class contents.
II. Creating Configuration Files
LoadableConfig uses TOML for configuration files. To make a configuration file, you must create a file that meets these requirements:
The file shall be located under
src/main/deploy/configurationand have the extension.toml.The identifier shall be identical to the identifier of the class field.
Using the CarConfig from above, a configuration file might be the following:
 1# example-car.toml
 2mpg = 32
 3odometer_measurement = 151_000
 4is_manual_transmission = true
 5
 6the_wheels = [
 7    { radius = 18.0, position = "front right" },
 8    { radius = 18.0, position = "front left" },
 9    { radius = 22.0, position = "back left" },
10    { radius = 22.0, position = "back right" }
11]
12
13[some_engine]
14number_of_cylinders = 8
15style = "Inline"
16liters = 5.7
17horsepower = 381
III. Utilizing the Config
Time to use our config!
1// RobotContainer.java
2public class RobotContainer {
3    public RobotContainer(){
4        CarConfig cfg = new CarConfig("example-config.toml");
5
6        // this subsystem needs that config!
7        SomeSubsystem ss = new SomeSubsystem(cfg);
8    }
9}
Making Changes
Steps
Make a change in your
*.toml.Run
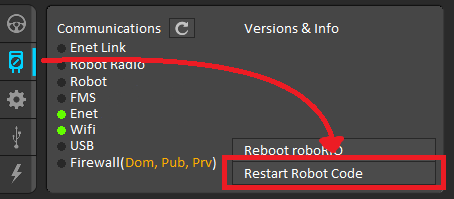
./gradlew deployStandalonefrcStaticFileDeployroborioin your terminal.Restart robot code:

Notes
I.
An effective strategy is to combine a subsystem with a configuration. You can nest the config class in a subsystem class by adding the static modifier:
 1// ExampleSubsystem.java
 2public class ExampleSubsystem {
 3    private ExampleSubsystem.Config cnfg;
 4
 5    public static class Config {
 6        public int some_data;
 7
 8        public Config(String filename){
 9            super.load(this, filename);
10        }
11    }
12
13    public ExampleSubsystem(ExampleSubsystem.Config cnfg)
14    {
15        this.cnfg = cnfg;
16    }
17}
1// RobotContainer.java
2public class RobotContainer {
3    public RobotContainer(){
4        // now the semantic meaning of the config is embedded
5        // into the namespacing of our program
6        ExampleSubsystem.Config cnfg = new ExampleSubsystem.Config("config.toml");
7        ExampleSubsystem ss = new ExampleSubsystem(cnfg);
8    }
9}